Demonstrations Page 6 - Thermodynamics
and Phase Changes
Scroll down to view photographs and short descriptions of
some of the demonstrations in the list below.
WARNING – Use at your own risk! We cannot guarantee the accuracy or the safety of these activities. Some of these activities are far more dangerous than others. The contributors and Bradley University do not assume any responsibility for these activities or their results. If you have questions, corrections, or comments please do not hesitate to contact Dean Campbell (campbell@bumail.bradley.edu) at Bradley University.
- Ferrofluid
Demonstrations
- Refrigerator
Magnet Demonstrations
- Polydimethysiloxane
Demonstrations
- LEGO® Brick Chemistry and Nanotechnology Demonstrations
- Spontaneous Assembly (or "Self
Assembly") of Hot Dog Slices
- Cut hot dogs into ~1 cm thick slices and place them in a
pan of water. They will float at the water's surface and attractive
capillary interactions will draw them together into an organized
close-packed array.
- References:
- Dungey, K. E. J. Chem. Educ. 2000, 77,
618.
- Campbell, D. J.; Freidinger, E. R.; Hastings, J. M.; Querns,
M. K. "Spontaneous Assembly of Soda Straws." J.
Chem. Educ., 2002, 79, 201.
- Campbell, D. J.; Freidinger, E. R.; Querns, M. K. "Spontaneous
Assembly of Magnetic LEGO® Bricks." The Chemical
Educator, 2001, 6, 321.
- Campbell, D. J.; Freidinger, E. R.; Hastings, J. M.; Querns,
M. K. "Spontaneous Assembly of LEGO®s." Chem13
News, Sept., 2001, 8.
-
- ABOVE LEFT: Cutting hot dogs into slices. ABOVE RIGHT: Floating
them in a pan of water. Note: sometimes tapping the pan will
help shake out some of the defects in the assembled pattern.
-
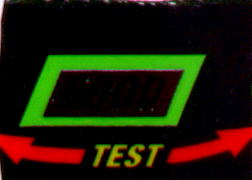
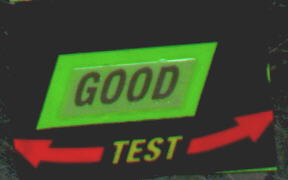
- Thermochromic Battery Tester
(thermochromic leucodye film)
- The built-in battery testers on common alkaline batteries
are based on films of thermochromic inks called leucodyes. When
the test "buttons" on the battery are pushed, a current
from the battery flows past the leucodye film, heating it slightly
and causing it to lose its color. To check this, I cut the battery
tester off an Energizer® "D" cell with a razor
blade. At room temperature the film appears dark, but body heat
can change the leucodye layer to colorless, exposing a green
background layer that provides contrast so the black-lettered
word "GOOD" may be read. The Energizer® and Duracell®
battery testers checked by Robert Bailey changed color at roughly
40 C.
-
- References:
- White, M. A.; LeBlanc, M. "Thermochromism in Commercial
Products" J. Chem. Educ., 1999, 76,
1201.
- Viiri, J.; Kettunen, L. "Temperature Profile of the
Duracell® Test Strip" Phys. Teach., 1996,
34, 276.
- Clark, R. W.; Bomicamp, J. M. "Tapered Resistors"
Phys. Teach., 1995, 33, 340.
-
- BELOW LEFT: The battery tester at room temperature.
- BELOW RIGHT: The battery tester in contact with a metal cup
of hot water as a source of heat.
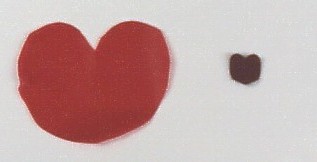
- Copper Mercury Iodide
(thermochromic powder)
- The synthesis and properties of this inorganic solid is described
in Ellis et al. "Teaching General Chemisty: A Materials
Science Companion." The material undergoes a phase transition
from a red solid at room temperature to a dark brown solid above
~55 C. This is due to enhanced ion mobility in the high-temperature
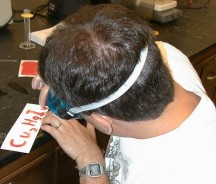
phase. When the synthesis is complete, the dry powder may be
smeared onto heavy paper and then laminated with transparent
tape or contact paper. This provides a means of handling the
material without coming into direct contact with the mercury
compound. The entire demonstration card may be heated with a
heat gun or a hot plate to illustrate the phase change.
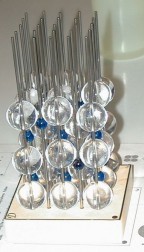
- ABOVE LEFT: A Solid State Model of the low-temperature phase
of copper mercury iodide.
- ABOVE RIGHT: Smearing copper mercury iodide on heavy paper.
Note the use of gloves and goggles.
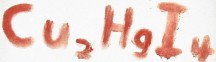
- BELOW LEFT: The demonstration card at room temperature.
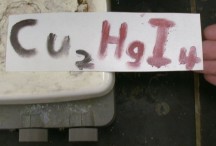
- BELOW RIGHT: The left side of the demostration card on a
hot plate. Note the darkening of the powder.
- Special thanks to Dr. David Shaw at the Madison Area Technical
College for providing the pictures.
-
- Memory metal (solid-solid
phase change)
 >>>
bend >>>
>>>
bend >>> >>> apply heat >>>
-
- ABOVE: Nitinol or "memory metal" as it is called
is a nickel-titanium alloy that may be "trained" to
remember its shape. If the proper kind of memory metal is trained
to a particular shape in its low temperature or martensite phase
(left) and is then bent out of shape (middle), then gently heating
the metal with a heat gun or hot water to its high temperature
or austenite phase will restore the metal to its trained shape
(right). Training the metal involves heating it to a much higher
temperature, such as that of a candle flame.
-
- To train a piece of wire, bend it to the desired angle outside
of a candle flame. Then hold onto the wire tightly and
place the desired bend point into the candle flame. Since the
material is a metal it will conduct heat, so you may find that
holding the wire with gloves or pliers is desireable. The wire
will initially try to straighten out as it heats up, but if you
hold the wire tightly it will then soften at the point
of the wire in the flame, creating a nice, tight bend. The hot,
bent wire may be cooled in water. The Institute for Chemical
Education sells memory metal versions of its ICE logo.
-
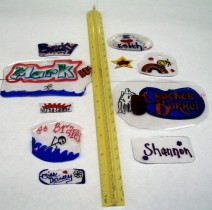
- Homemade Shrinky Dinks®
- Transparent polystyrene packaging such as those used to hold
baked goods can be used to make plastic trinkets. (Not all clear
packaging works. Polystyrene containers should have a number
6 inside the recycling triangle on the plastic.) When the plastic
is heated, stretched-out polymer chains have enough energy to
relax their orientations. As a result, thin flexible sheets of
the clear polystyrene will shrink laterally, thicken, and become
less flexible. Writing that was placed on the surface of the
polystyrene with permanent markers will also shrink. This polymer
behavior is the basis for Shrinky Dinks®, a craft/toy that
was popular in the 1970s and 1980s, and can still be purchased
today.
-
- ®Shrinky Dinks is the Registered Trademark of K &
B Innovations, Inc.
-
- ABOVE: The polystyrene "windows" on envelopes can
be used to make Shrinky Dinks®. Before (LEFT) and
after (RIGHT).
- BELOW: Patterned polystyrene sheets before (LEFT)
and after (RIGHT) being placed in an oven. Use a relatively
low temperature (about 65 C) or they will melt rather than shrink!
NOTE: Many but not all sheets of polystyrene will shrink and
not all sheets will shrink equally in all lateral directions.
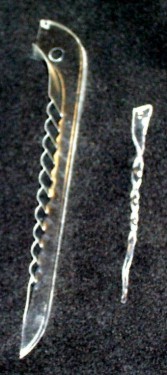
- BELOW LEFT: Making clear polystyrene icicles. There is
a significant burn risk here. A polystyrene sheet placed
on aluminum foil in a toaster oven at 300 F or simply to "toast"
mode will shrink fairly quickly (it is fun to watch - but don't
leave them in the oven too long or they might melt). A narrow
triangle of polystyrene container material, with a hole punched
in the top, is shown at LEFT. The wrinkles usually flatten out
upon heating. While the shrunken sheets are still hot,
remove them from the oven, twist them quickly into a spiral shape,
and hold until they have cooled, as shown at RIGHT. If the shape
of the twist is unsatisfactory, placing the icicle back into
the oven will untwist it. Again, there is a significant burn
risk here. My wife loaned me her thimble to provide a measure
of protection.
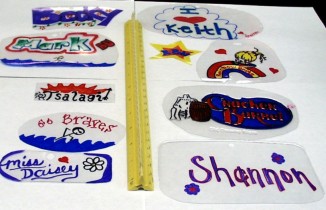
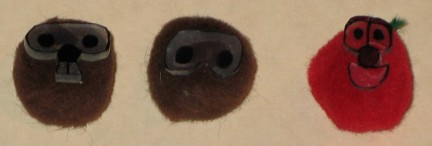
- BELOW RIGHT: One can make interesting faces on polystyrene
sheets, shrink them, and attach them to pom-poms. (Hot melt glue
works much better than school glue for this.) Placing a magnet
on the back enables the decoration to stick to a refrigerator
door. The picture below includes a couple versions of moles (a
popular mascot for chemists) and a tomato cartoon character that
is popular in the Campbell household.
-
-
-
-
- Liquid Nitrogen Demonstrations
- Kylee Korte, Phuong Nguyen, and Joel Kouakou assisted in
preparing these descriptions.
-
- CAUTION: Liquid nitrogen is very cold and presents a serious
frostbite hazard, especially if it gets trapped against your
skin (e.g.in your clothing). Additionally, gaseous nitrogen occupies
more volume than the same quantity of liquid nitrogen. Gaseous
nitrogen produced quickly enough in sufficient quantities can
displace oxygen from the air. Containers filled with liquid nitrogen
could fail without warning due to thermal shock or gas pressure.
Protect yourself accordingly.
-
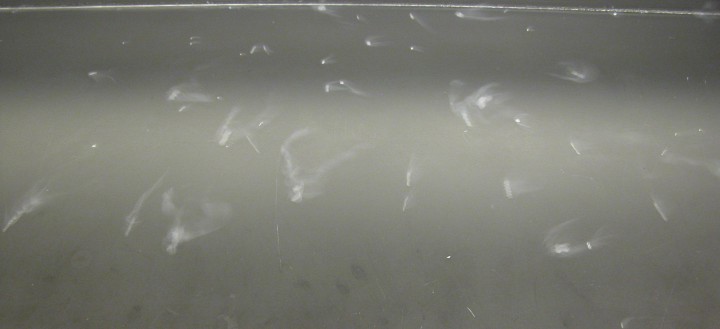
- Leidenfrost Effect
- Named after Johann Gottlob Leidenfrost, a German doctor,
the Leidenfrost Effect is an occurrence where a liquid comes
in contact with a material that is much hotter than its boiling
point and creates a vapor layer to prevent it from further direct
contact with the material. The liquid then boils much more slowly
as it is protected by the insulating vapor layer. Liquid nitrogen
on a smooth surface at room temperature can illustrate this phenomenon.
The liquid nitrogen is obviously the liquid and the surface
is the material that is much hotter than it. Droplets of the
liquid nitrogen will move easily across the surface, supported
on cushions of nitrogen vapor.
- Reference:
- Wikipedia: Leidenfrost effect. http://en.wikipedia.org/wiki/Leidenfrost_effect
(accessed June, 2006).
- BELOW: Droplets of liquid nitrogen exhibiting the Leidenfrost
effect.
-
-
- NOTE:
- Liquid nitrogen based geyser, base surge, and downburst demonstrations have been moved to Demonstrations Page 9 - Geology.
-
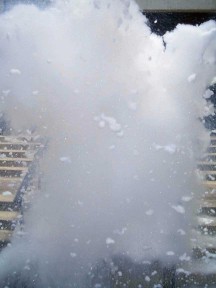
- Soap Suds Explosion
- I saw this demonstration on the "David Letterman Show"
and just had to try it. It simply involves quickly pouring liquid
nitrogen (WARNING: Extremely COLD!) into hot water (WARNING:
HOT!) containing dishsoap. The liquid nitrogen flashes to nitrogen
gas, causing a large explosion of rather cool soap suds. This
demonstration is best done outside since so many suds are produced.
An awesome demonstration of phase changes!
-
- BELOW LEFT: The soap suds explosion.
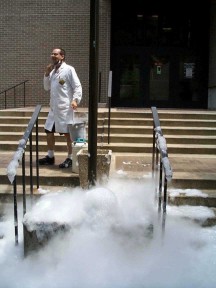
- BELOW RIGHT: Aftermath of the soap suds exposion. I got suds
all over me from this one (note the suds on the step rails and
on the ground).
-
-
Return to Dr. Campbell's Favorite
Demonstrations
Last updated 1/17/12
Site created at the laboratory of Dean Campbell